Comment définir une URL canonique par élément dans Webflow CMS

Passons maintenant à autre chose. Si vous publiez beaucoup de contenu en utilisant Flux Web, vous avez probablement rencontré à un moment donné un problème de référencement courant avec les liens canoniques. Les paramètres généraux du site de Webflow permettent d'ajouter facilement une seule balise canonique sur toutes les pages de votre site. C'est très utile. Mais que se passe-t-il lorsqu'un élément CMS spécifique, par exemple un article de blog diffusé depuis un autre domaine, a besoin de son propre lien canonique ? Par défaut, Webflow ne fournit pas de contrôle par élément pour les canoniques au niveau des éléments du CMS. Et l'utilisation d'un code personnalisé pour en ajouter une peut rapidement mélanger des balises globales et des balises par page, vous laissant ainsi avec des doublons ou des balises href vides qui embrouillent les moteurs de recherche et pénalisent votre référencement.
Chez Opus Guard, nous utilisons Webflow, et nous l'aimons beaucoup. Mais parfois, nous devons personnaliser le comportement pour obtenir le bon résultat. Dans cet article, j'expliquerai le problème canonique auquel nous sommes confrontés avec les articles de blog syndiqués provenant d'une autre source originale. Et je vais partager deux scripts résilients que vous pouvez utiliser dans votre modèle d'articles de blog (dans la <head>zone de code personnalisée) pour résoudre ce problème pour chaque article de blog individuel, tout en laissant le paramètre de balise canonique global activé dans Webflow pour votre site.
Le problème : besoins canoniques globaux ou besoins occasionnels par article
- Le concepteur de Webflow vous permet de définir un lien canonique global, mais les balises canoniques sont une question d'opinion : chaque page doit contenir au plus un lien canonique rel= « canonical » pointant vers l'URL définitive de ce contenu. S'ils en ont plus, les moteurs de recherche sont confus et le référencement en souffre généralement.
- Pour les collections CMS, en particulier les articles de blog, vous avez parfois besoin d'un canonique par élément. Par exemple, lorsqu'un article a été initialement publié ailleurs et que vous souhaitez le partager à nouveau (avec autorisation !) , ou lorsqu'une ancienne structure d'URL doit être respectée pour un seul article.
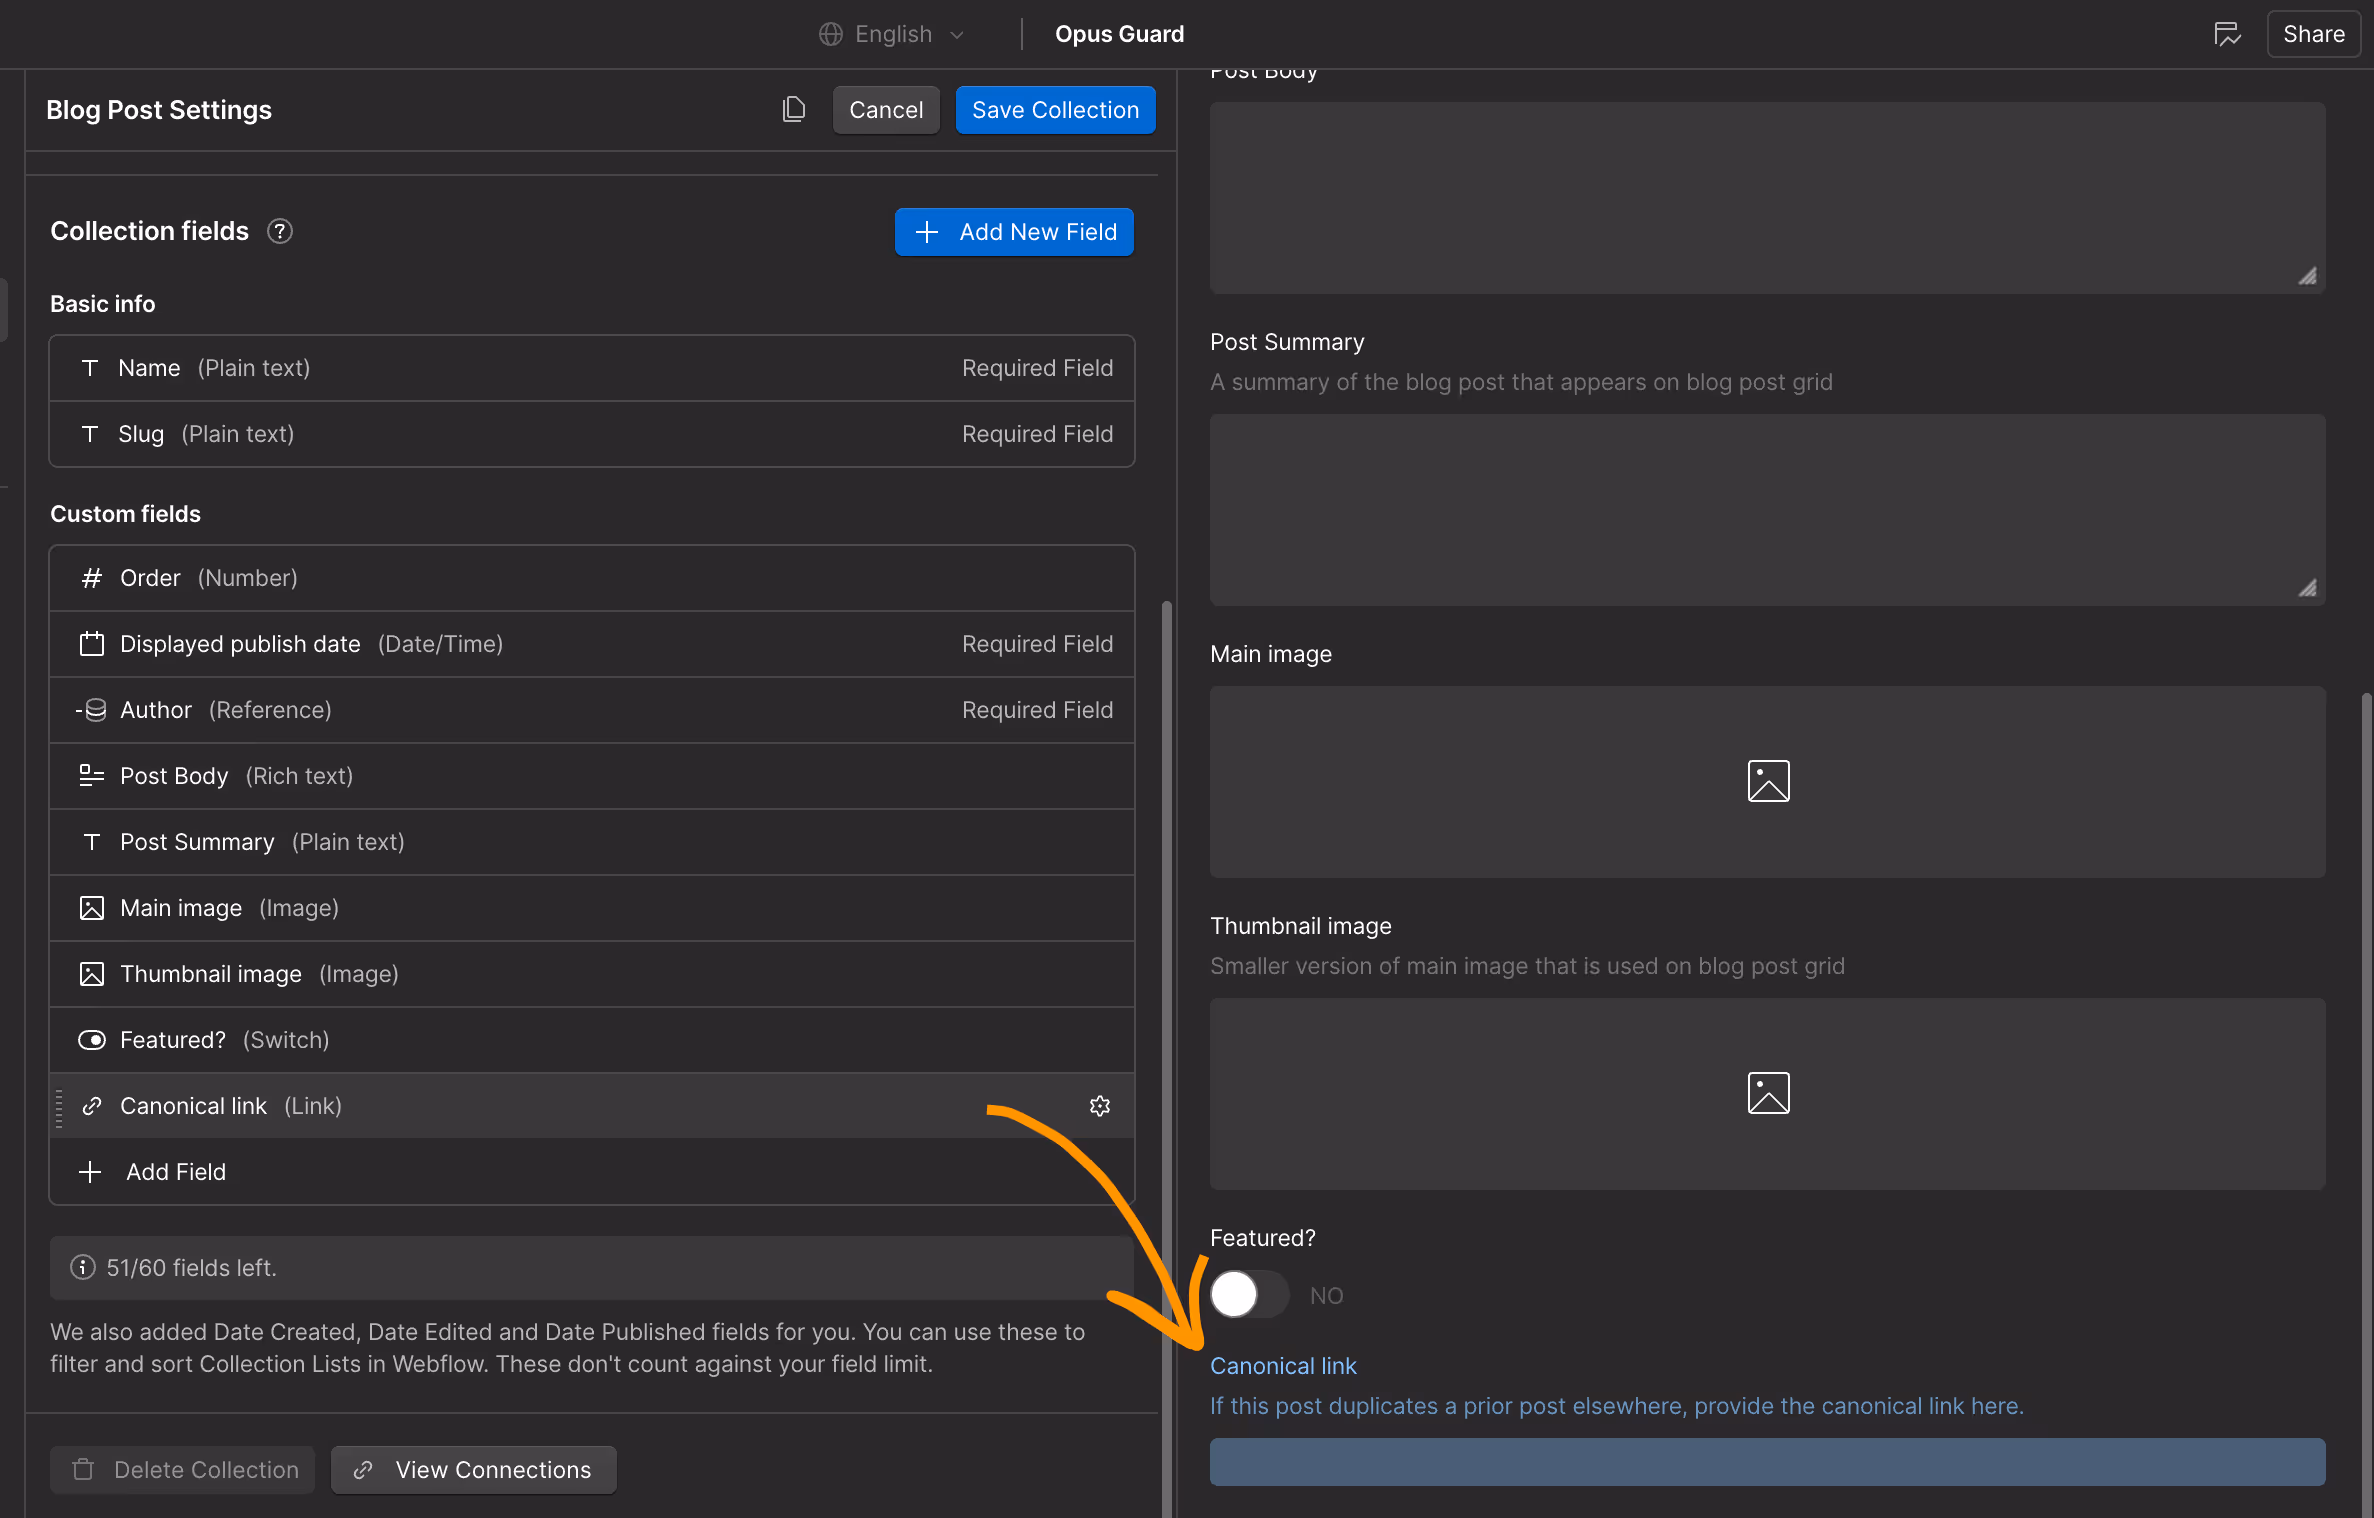
- <head>Les collections Webflow CMS peuvent comporter un nombre illimité de champs. Vous pouvez donc ajouter un champ de type lien avec un nom tel que « Lien canonique » et l'injecter dans la zone d'un article de blog à l'aide d'un simple code personnalisé. Remarque : vous devez le faire dans le modèle de page, plutôt que dans le code d'une intégration HTML dans l'article, afin que la plupart des robots puissent voir correctement la balise affichée.
- Si vous le faites sans plus de soin, vous vous retrouverez avec plusieurs balises canoniques : l'une provenant des paramètres généraux de Webflow, plus une autre injectée via votre code personnalisé (ou pire encore, un lien canonique vide/non valide). Les moteurs de recherche peuvent ignorer les deux doublons ou choisir le mauvais, mais de toute façon, votre référencement en souffrira généralement.
Présentation de la solution
La solution est simple : ajoutez votre canonique personnalisé et supprimez l'autre. En pratique, j'ai découvert que cela nécessitait deux morceaux de code personnalisé javascript dans la <head>balise du modèle de page CMS pour de tels articles. Les scripts effectuent certaines opérations dans l'ordre suivant :
- Choisissez un lien canonique personnalisé si il est paramétré en option pour votre article dans le CMS
- Supprimez les autres doublons provenant des paramètres généraux de votre site, garantissant ainsi qu'un seul lien canonique existe pour votre publication
- Définissez le lien personnalisé <head>comme lien canonique pour votre article publié
Étapes et scripts
Tout d'abord, modifiez votre collection CMS et ajoutez un nouveau champ de lien. Nous avons baptisé le nôtre Lien canonique mais tu peux lui donner le nom que tu veux.
Ensuite, le code que j'utilise fait plusieurs choses :
- vérifiez si l'article du CMS a une valeur dans
Lien canoniquechamp - si oui alors
- supprimer tous les liens canoniques existants, et
- créez le href avec le type rel= « canonical » en utilisant cette valeur
- sinon ne rien faire
La plupart des recommandations de la communauté Webflow suggèrent de désactiver le canonique global par défaut dans les paramètres de votre site et de le gérer manuellement via un code personnalisé sur chaque page statique et chaque modèle de collection CMS. Cela permet certes un contrôle précis partout, mais cela crée également un travail supplémentaire pour ceux d'entre nous qui ne syndiquent une publication que de temps en temps. Depuis cette est notre cas d'utilisation, alors notre approche du code consiste simplement à toujours remplacer chaque canonique uniquement sur les articles qui en ont un personnalisé. Notez que l'aspect « sinon ne rien faire » de ce script est très important, car il est très facile de définir accidentellement un doublon canonique ou même de supprimer complètement votre lien canonique si le script ne fait pas attention aux vérifications avant les actions.
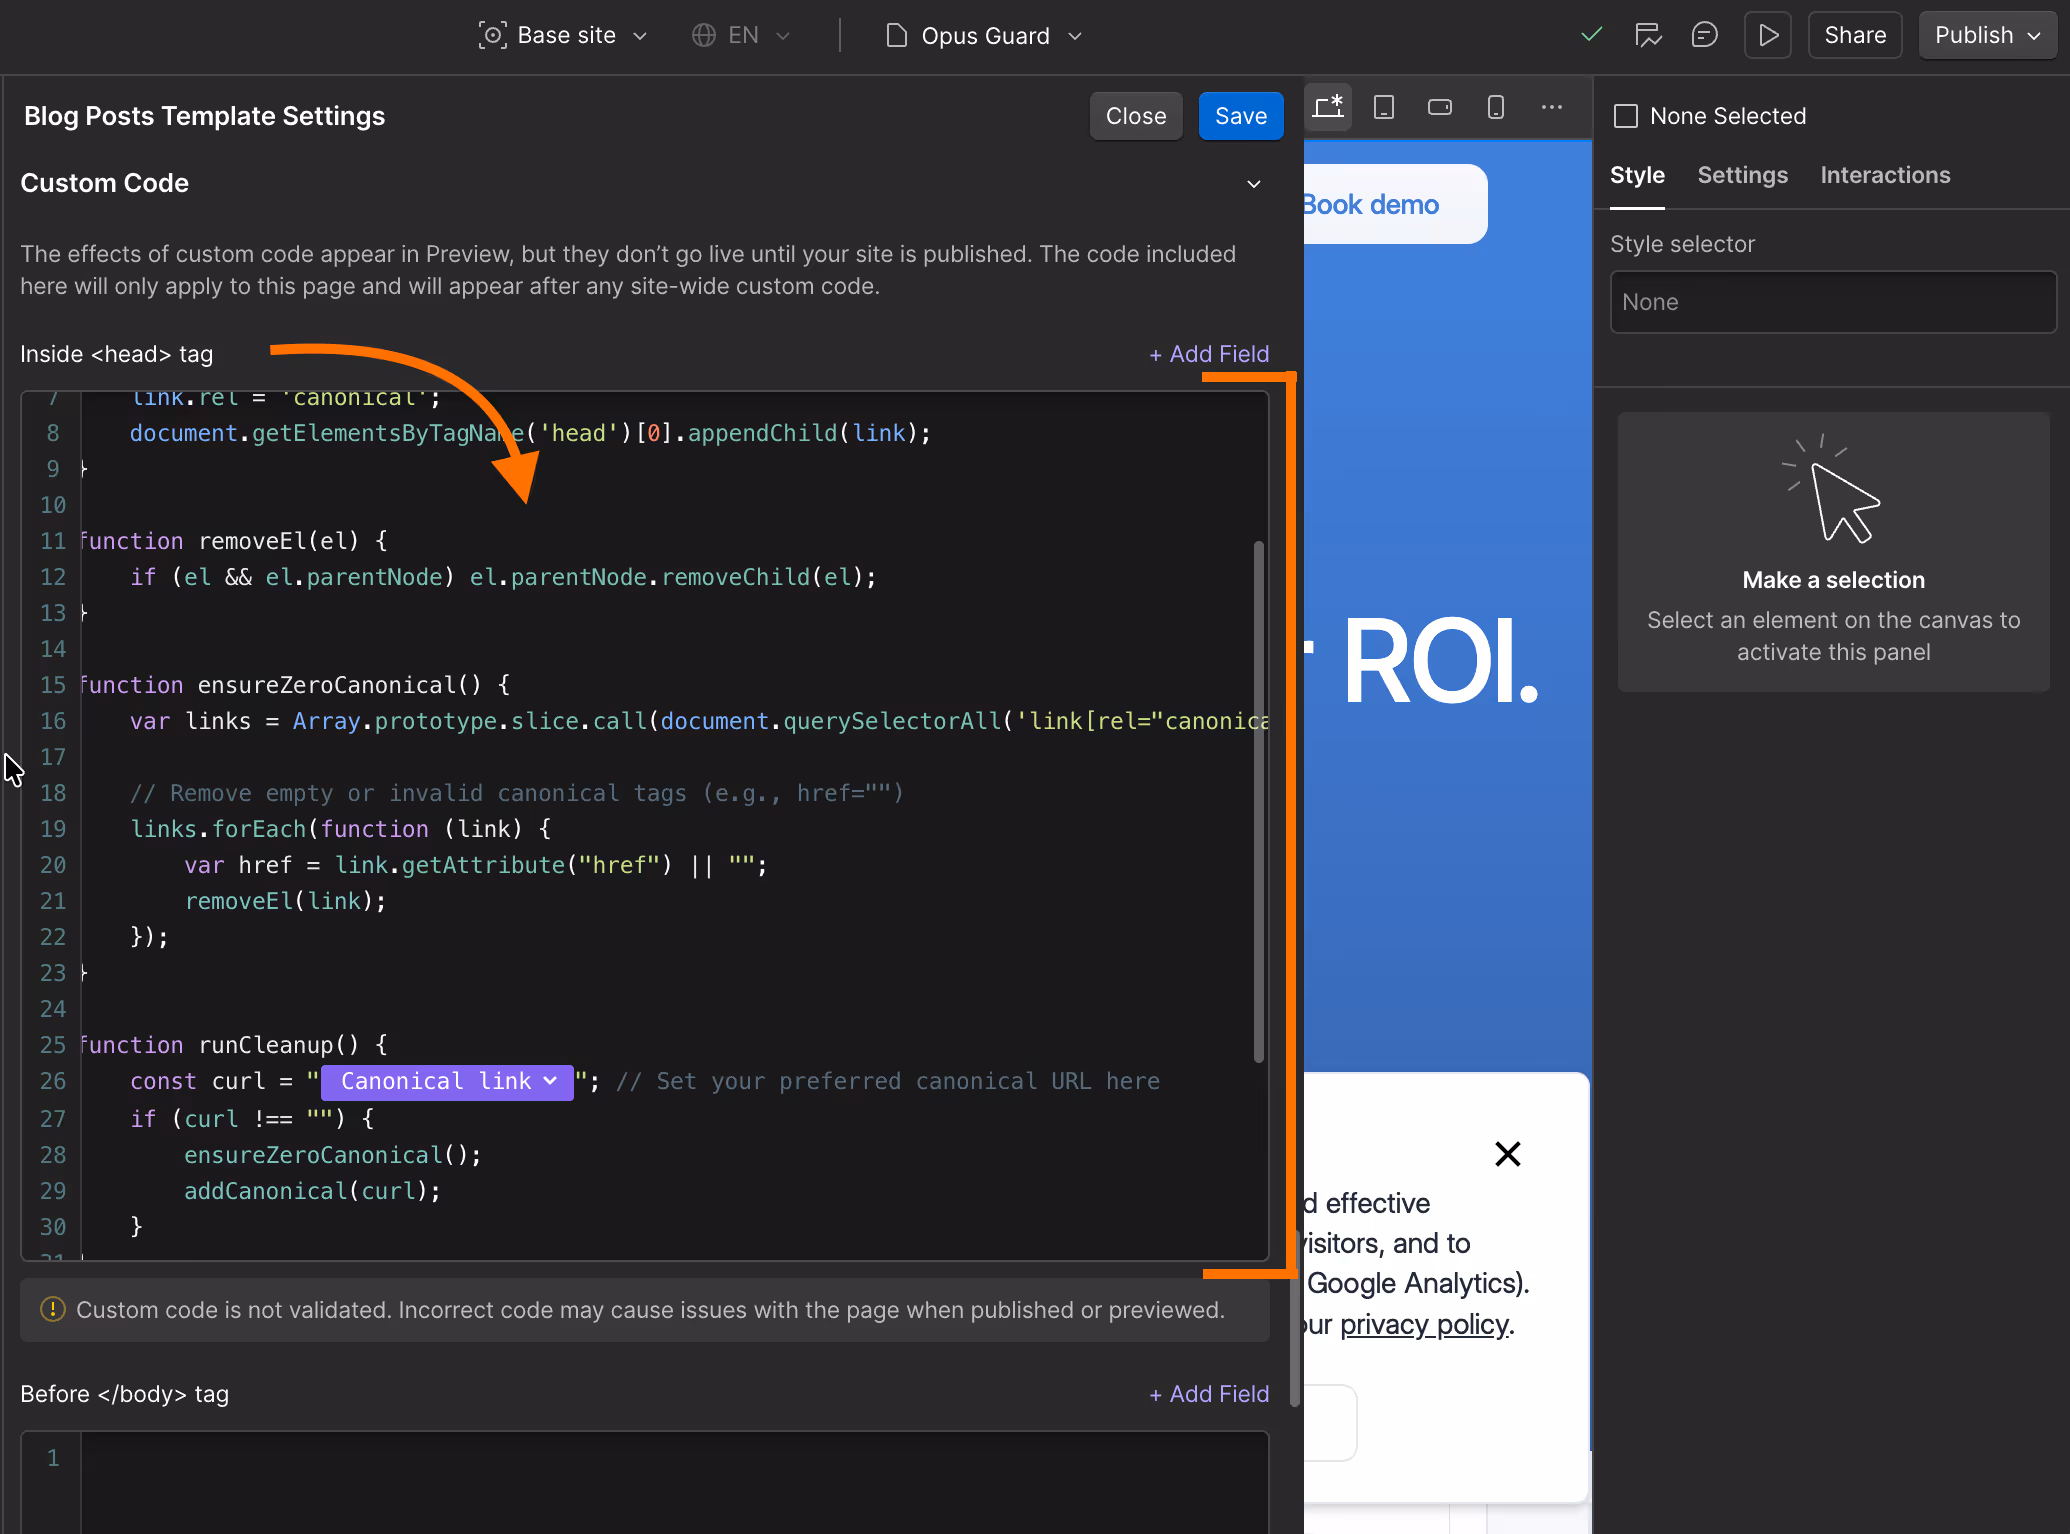
Voici le script que nous utilisons : vous pouvez placer ce bloc dans le code personnalisé du modèle d'articles de blog situé dans la <head>zone. Il lit le champ de collection CMS et garantit une balise canonique unique et valide. Assurez-vous simplement d'utiliser votre propre variable [Lien canonique ▽] avec le nom de champ que vous avez choisi pour votre propre collection CMS.
<script>
    (function () {
        // If you have a canonical you want to remove (e.g., Webflow global root)
        function addCanonical(href) {
            link = document.createElement("link");
            link.href = href;
            link.rel = 'canonical';
            document.getElementsByTagName('head')[0].appendChild(link);
        }

        function removeEl(el) {
            if (el && el.parentNode) el.parentNode.removeChild(el);
        }

        function ensureZeroCanonical() {
            var links = Array.prototype.slice.call(document.querySelectorAll('link[rel="canonical"]'));

            // Remove empty or invalid canonical tags (e.g., href="")
            links.forEach(function (link) {
                var href = link.getAttribute("href") || "";
                removeEl(link);
            });
        }

        function runCleanup() {
            const curl = "[Canonical link ▽]"; // Set your preferred canonical URL here
            if (curl !== "") {
                ensureZeroCanonical();
                addCanonical(curl);
            }
        }

        if (document.readyState === "complete") {
            runCleanup();
        } else {
            window.addEventListener("load", runCleanup);
        }
    })();
</script>
Et le tour est joué ! Ces quelques éléments étant en place et le site étant à nouveau publié, mon article de blog contient désormais un ensemble de liens canoniques corrects et valides selon mes besoins, tandis que tous les autres utilisent simplement le paramètre canonique global par défaut de Webflow.

Résumé - liste de contrôle de configuration
- Ajoutez un champ de lien nommé « Lien canonique » à votre collection CMS d'articles de blog.
- Dans les paramètres du modèle d'articles de blog, collez le code personnalisé ci-dessus dans le <head>(veillez à utiliser votre propre nom de variable).
- <head>Publiez le site et un article de blog avec un canonique personnalisé, ouvrez l'article et examinez les éléments suivants :
- Si le champ Lien canonique est renseigné : la balise canonique doit pointer vers votre URL personnalisée.
- Si le champ est vide : vous devriez voir apparaître un canonique pointant vers la page en cours, sans doublons.
Quand utiliser des canoniques par élément
- Contenu syndiqué initialement publié ailleurs.
- Consolider les chemins dupliqués où un seul doit être classé.
- URL héritées qui continuent à accumuler des signaux mais redirigent vers une nouvelle structure.
- Pages expérimentales ou variantes A/B dont une seule doit être indexée en tant que source faisant autorité.
Ce qu'il ne faut pas faire
- N'incluez pas plusieurs canoniques en espérant que les moteurs de recherche le trouveront ; ce n'est souvent pas le cas.
- N'utilisez pas d'URL relatives dans les balises canoniques ; utilisez toujours des URL absolues et normalisées.
- Ne pointez pas les canoniques vers des contenus complètement différents ; les canoniques concernent des pages presque identiques sur lesquelles vous souhaitez consolider les signaux.
La simplicité de Webflow est un atout, mais le référencement nécessite souvent un contrôle nuancé. Avec un code personnalisé, vous pouvez conserver la facilité de la plateforme tout en donnant à vos éléments CMS un comportement canonique précis uniquement en cas de besoin. Résultat : des signaux plus propres, moins de surprises en matière d'indexation et des performances plus fiables pour le contenu syndiqué ou existant.